Tuesday, January 26, 2010

SHUTTER SPEEDS AND APERTURES

Aperture


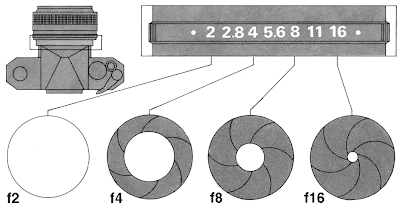
F-stops
f1 f1.4 f2 f2.8 f4 f5.6 f8 f11 f16 f22 f32 f64


All cameras, whether an ancient film camera, or a more modern digital, work in pretty much the same way. Photographs are taken by letting light fall onto a light-sensitive medium, which records the image.
The aperture controls the amount of light that reaches a light sensitive medium, wither it be digitally, film, or paper. The aperture controls the intensity at which light will strike the film. An aperture acts much like the pupil of an eye that opens larger as light decreases to let in more available light. The pupil shrinks when light increases to reduce the amount of light entering the eye.
Put simply, a camera consists of a light-tight box or even film canister, that stores a light-sensitive device, a lens that magnifies and focuses the image onto that light-sensitive device through a hole in the box (called the aperture), and a shutter that opens and closes when you press the shutter release, exposing the film to the light; this is why a picture is sometimes called an exposure.
The amount of light entering the camera depends on the amount of light in the scenes that you’re photographing. A bright sunny cloudless day has more available light than a cloudy one, which in turn has more light than an indoor scene lit by tungsten lighting. To make the picture look right, we have to expose the film to the right amount of light. Too short, and the image will be light, or underexposed. Too long, and the image will be dark, or overexposed.
The combination of aperture and shutter speed are related, and effect the exposure value. The faster the shutter speed, the larger the opening of the lens and visa versa. Aperture and shutter speed have to come together in balance based on a given lighting scenario to make the proper exposure.

The diameter of an aperture is measured in f-stops. A lower f-stop number opens the aperture and admits more light onto the camera. Higher f-stop numbers make the camera's aperture smaller so less light hits the film.
When an aperture is opened up by one f- stop, the amount of light which reaches the film is doubled.
Aperture settings can be used creatively to control depth of field, how much of a photo is sharp in front and back of where you focus on the main subject. The technique is useful for close-up and portrait shots.


Shutter speeds

B 1 2 4 8 15 30 60 125 250 500 1000 2000 4000
The concept of shutter speed isn’t too hard to understand. The longer you leave the shutter open, the more light that strikes the film, resulting in a darker image.
Shutter speeds are measured in fractions of a second, and is the time taken from when the shutter opens to when the shutter closes, after you’ve press the shutter. Moving from one speed to the next either halves the amount of light that can enter the camera or doubles it. The change from one speed to another (and halving or doubling the light that enters the camera) is called moving a stop. What affect does changing shutter speed have on your final image? As well as controlling the amount of light that enters the camera, shutter speed effects motion and blur. While fast shutter speeds can “freeze” motion, slower shutter speeds extend activity or blur moving objects.

Film and Exposure

Film and Exposure

Films:
Black and White – You will be using T-MAX 400
• Negative
Panchromatic – film that is sensitive to all the wavelengths in the visible spectrum.
Orthochromatic – film that is sensitive to blue and green light but not red light.
Film’s make-up:
[ Scratch resistant top coat
[ Light sensitive emulsion
[ Film base
[ Anti-halation coating


Cross section of film emulsion.

The Latent Image is formed when light acts on a photographic emulsion. This image is invisible until the emulsion is developed using photographic developers, such as D76

ISO/ASA
To calculate the ASA number multiply the ISO by one.
The ASA number is a measurement of the film's sensitivity to light, often referred to as its “speed”.
1. The higher the number the more sensitive to light.
2. As the number doubles, the films sensitivity to light doubles
3. Lower ISO films have less grain structure.
4. Higher ISO films have more grain structure.

Other film characteristics:
• Grain
• Contrast
• Expiration Date
• Storage Temperature

Exposure
Exposure is the amount of light that strikes the photo material -- film or printing paper.
Four things effect the exposure:
1. The film ISO
2. The amount of available or existing light
3. The time the light strikes the film
4. The intensity of light that strikes the film in that time.

Exposure = Time x Intensity
Shutter Speed
Time is controlled by the shutter. The time the shutter remains open lets light strike the film is controlled by the shutter speed. Typical shutter speeds:
1/1000 1/500 1/250 1/125 1/60 1/30 1/15 1/8 1/4 1/2 1 B
fast shutter speed = less light slower shutter speed = more light
1. As the shutter speed is increased (a faster shutter speed) less light strikes the film.
reducing the exposure
• Increase the shutter speed by a standard “unit” reduces the light striking the film by half.
2. As the shutter speed is reduced (slower shutter speed) more light strikes the film,
increasing exposure.
• Reducing the shutter speed by a standard “unit” doubles the light striking the film.

Shutter speed controls the illusion of motion
1. fast shutter speeds stop action
2. slow shutter speeds blur motion
3. panning freezes subject and blurs background

F-stops and Apertures
The intensity of light that passes through the lens and strikes the film is controlled by the
Aperture. The aperture is expressed in f-stops. Typical f-stops are:
f 1.4 f2 f2.8 f4 f5.6 f8 f11 f16 f22 f32 f64
< ---- more light less light ---->
• A large aperture, such as f2, lets in more light than a smaller aperture such as f16
• Each time the aperture decreases to the next smaller f-stop the amount of light it passes is cut in half.
• As the aperture increases to the next bigger f-stop the amount of light it passes
doubles.
• Different f-numbers provide different depth-of-fields.

How to determine the correct exposure
1. Film instructions
2. The sunny f16 Rule = In full sun set the camera aperture at f16 and the shutter to the speed of the ASA/ISO you are shooting.
3. Light meter
• Only a guide - it is only as accurate as the person using of it
• Light meters interpret (some) colors and tones as medium gray (18%)
• Never point your light meter toward the sun!!!

Camera Light meters
• Battery
• One shutter speed may work without battery
• Always have extra!
• Preset (No light meter)
• Manual
• Semi-automatic
• aperture preferred
• shutter preferred
• Fully automatic
• Programmable
• Displaying exposures - needle match Vs centering Vs lights

Bracketing
Taking several different exposures of the same scene at different exposure settings, some greater than and some less than the setting indicted by the meter, to ensure a well exposed photograph.


SUNNY 16 RULE

Getting started.....

The first thing we'll need to address is the syllabus and class schedule:

ART 160 Section 1132 Fall 2010

Class Title: Basic photography Time: M-W 11a – 1:50p

INSTRUCTOR: Rob Keller

rkeller@dvc.edu or bordog@me.com

OFFICE HOURS: M-W 10:30 – 11a or by appointment

COURSE DESCRIPTION

This is an introductory photography class structured to provide a solid foundation in black and white analog image making. The class will cover the working knowledge of the basics of traditional black and white darkroom photography. Instruction will include 35mm camera operation, film exposure and development, printing, basic lighting concepts, composition, and photo finishing. This course will emphasize the technical aspects of analog photography including the history, theory and practice. Through specific assignments students will not only gain technical skills, but also develop their own artistic vocabulary by learning to use the photographic medium as a means of creative expression. Class critiques will be used to analyze and discuss photographic images.

STUDENT LEARNING OUTCOMES

Results for ART-160 course outcomes. Students will be able to...

At the end of the semester each student should have acquired the necessary skills to produce effective and visually compelling photographic images for class presentation.

SLO#1. students completing the course should demonstrate an understanding of basic black and white photographic printing techniques.

SLO#2. students completing the course should demonstrate knowledge of proper black and white photographic film exposure and film processing techniques.

SLO#3. students completing the course should demonstrate an understanding of the basic principles and concepts of composition and design to communicate visually using black and white photographs.

PROJECTS

Projects will be graded on both technical proficiency and creative visual content. Students will be expected to discuss and defend their work. Assignments will demonstrate mastery of technical skills and individual creative expression. Through photographic presentations and discussion, students will gain familiarity with the critical and theoretical debates surrounding photography and analytical dialog.

HANDOUTS AND LECTURES

Each week there will be a lecture and students will receive handouts with the information needed for the next week's assignment. The schedule may change at any time during the semester. If you miss a class or assignment you are responsible for contacting the instructor.

ATTENDANCE POLICY

Attendance means arriving on time and staying for the entire class session. You must be present at all critiques whether or not you have completed the assignment. All students are required to have active communication and dialog. Failure to be an involved participant in the class, tardy arrivals and early departures will affect your final grade. If you have more then 3 unexcused absences you could be dropped from the class. Due dates are important, late assignments could result in a lower grade.

GRADING

All aspects of the class are equally important:

Quizzes – 10%

Monthly Projects –20%

Final Project – 50%

However, your contribution to the CLASS DIALOG AND THE WRITTEN FINAL will weigh very heavily on your final grade.

REQUIRED MATERIALS

35mm CAMERA:

Recommended manually adjustable apertures and shutter speeds.

PHOTOGRAPHIC PAPER:

Recommended: ILLFORD Multigrade II RC

You will need approximately 50-150 sheets for this class.

FILM:

Recommended: Kodak 400 TMAX

You will need 15-30 rolls for this class

Negative preservers (5 frames x 7 rows)

3 ring plastic negative protector, Portable canned air - dust off, Plastic apron, Cotton towel, sharp scissor

RECOMMENDED MATERIALS

Protective clothing and rubber gloves, “Sharpie-type marking pen, and

Optional * Sketchbook for collecting ideas and logging data.

HEALTH AND SAFETY

THIS FACILITY IS FOR USE BY CURRENTLY REGISTERED PHOTOGRAPHY STUDENTS ONLY.

UNIVERSAL DARKROOM LAW -

Keep wet away from dry! There are specific wet and dry areas for all printing areas. Sinks are wet, stations are dry! No wet hands, no wet prints, no trays are to be near the enlargers.

There is an “ABSOLUTELY NO CELL PHONE” policy in place at this facility. All cell calls must be taken outside to avoid disturbing the class.

*** IF YOU HAVE ANY QUESTIONS OR NEED HELP, PLEASE LET ME KNOW IMMEDIATELY. DO NOT PROCRASTINATE