Monday, February 8, 2010

Quality of Light

Art 160: Basic Black and White Photography

Quality of Light

Equipment Needed: Camera, minimum of 1 roll of ISO 400 film

Make the quality of light the focus of your photographs. Look for patterns of light and situations where you are more conscious of the light than the actual object or scene.


Make sure you Bracket!!!

Remember that the presence of strong light often means that there will be serious or strong shadows. Experiment with at least 10 – 15 frames making images where you are not sure if the photograph will accentuate the shadows or the light casting the shadows. Bring your exposed roll of film with contact sheet to class on Wednesday the 10th of February.

Some lighting conditions to consider:

reflected/absorbed soft/harsh

bright/diffused dawn/dusk

early morning/late afternoon

high noon/overcast midday

abstractions/patterns made by light front, back, and side light


Do not use you flash for this assignment!

Use only ambient/available light (this may include sun, lamps, overhead lights, etc..)

Requirements for Assignment:

At least 1 roll of film

A contact sheet


Quality of Light

Highlights


Highlights are the lightest areas on the objects. Notice how the highlights appear on shiny

objects, on glass, on light objects and on dark objects. Notice where on an object the

brightest highlights appear and how they go from highlight to shadow. Does the light end

sharply or does it gradually blend into deeper tones? How does the

light change as you move the object around, or as you move around the object?


Patterns made by light - reflection in water, trees, glass, atmosphere (haze, pollution, dust, varying degrees of precipitation)

The direction, quantity, color, and quality of the light you use determines how your subjects appear. Daylight and sunlight are not a constant source, because they change hourly and with the weather, season, location, and latitude. This unstable light can alter the apparent shapes, colors, tones, and forms of a scene. The direction of light changes as the sun moves throughout the day. The shape and direction of shadows are always changing, and the different directions of sunlight greatly influence the appearance of a scene.

The quality of sunlight depends on its power and path. Strong, direct sunlight is "hard" because it produces dark, well-defined shadows and brilliant sometimes blown-out highlights. Sunlight is brutal on clear summer days at noon. Strong sunlight makes strong colors more brilliant, but weak colors pale. Sunlight is diffused by haze, mist, overcast, and pollution in the air. This diffused or reflected light is softer; it produces weak, soft shadows and dull highlights. Directionless, diffused sunlight is often called "flat" lighting because it produces fine detail but subdues or flattens form. Fragile, directionless sunlight provides vibrant, well-saturated colors.

Exciting effects can be achieved by changing the angle your shooting which will influence the light falling on your subject. As you turn your subject, change the light falling on your subject or wait for the sun to move, the light may fall more on one side, and more shadows may be cast on the opposite side of the subject. For pictures in which texture is important, side lighting is ideal.


softsubtle, diffused light

broad sources: diffused or reflected

flat or weak

overcast or open shade

absorbed or obstructed

dawn or dusk

farther away


harsh – hard light with distinct shadows

directional sources: side, front or behind subject

contrasty or bold direct sun light

bright or intense midday

closer to subject


more information on quality of light:

http://www.davideaves.co.uk/PhotoTips/AvailableLight.html

http://www.outdoorphotographer.com/how-to/shooting/quality-of-light.html

http://www.ted.photographer.org.uk/photoscience_lighting.htm

http://pages.cthome.net/rwinkler/light.htm

Tuesday, February 2, 2010

Ray-o-grams

MAN RAY
Emmanuel Radnitzky (August 27, 1890 – November 18, 1976)

Emmanuel Radnitzky & Salvador Dali

Man Ray, born Emmanuel Radnitzky (August 27, 1890 – November 18, 1976), was an American artist who spent most of his career in Paris, France. Perhaps best described simply as a modernist, he was a significant contributor to both the Dada and Surrealist movements, although his ties to each were informal. Best known in the art world for his avant-garde photography, Man Ray produced major works in a variety of media and considered himself a painter above all. He was also a renowned fashion and portrait photographer.


Man Ray, Le Violon d'Ingres, 1924
Epreuve gélatino-argentique montée sur papier


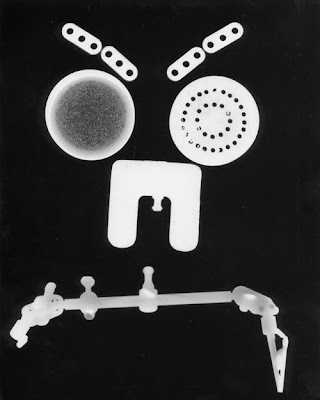
RAY-0-GRAMS
or sometimes called PHOTO-Grams
The technology of photography was one of the favorite media of the Dada artist Man Ray; his inventive technique of placing objects on light-sensitized paper as in his Rayogram, (1922), showed the abstract possibilities of photograph. He was always exploring new mechanical ideas and "his crisp and ethereal photographs and maliciously witty objects were a revelation" (Gale 197).

"When I saw I was under attack from all sides, I knew I was on the right track."
-Man Ray

“I do not photograph nature. I photograph my visions.”
–Man Ray


A creator needs only one enthusiast to justify him
–Man Ray


An original is a creation motivated by desire. Any reproduction of an originals motivated be necessity. It is marvelous that we are the only species that creates gratuitous forms. To create is divine, to reproduce is human.
–Man Ray


All critics should be assassinated.
–Man Ray

Don't put my name on it. These are simply documents I make.
–Man Ray


I paint what cannot be photographed, that which comes from the imagination or from dreams, or from an unconscious drive.
–Man Ray

I photograph the things that I do not wish to paint, the things which already have an existence. -Man Ray

It has never been my object to record my dreams, just the determination to realize them.
-Man Ray

Of course, there will always be those who look only at technique, who ask 'how', while others of a more curious nature will ask 'why'. Personally, I have always preferred inspiration to information.
-Man Ray

One of the satisfactions of a genius is his will-power and obstinacy.
-Man Ray

To me, a painter, if not the most useful, is the least harmful member of our society.
-Man Ray

RAY-O-
WANNABEES
but still pretty cool....


Student projects


What happens in the tank during development

When you expose film to light, by opening the shutter, the light reacts with the light-sensitive silver-halide particles in the film emulsion. At this point, the reaction is invisible. The film must be developed in order for the reaction to be visible. The film is developed using a chemical developer, which turns the exposed silver-halide particles into a black metal (silver). The film stays in the developer for the correct time to turn the right amount of halides into silver. The dark areas in the original image will have the least amount of silver on the film, and appear transparent. The lighter areas, conversely, will have the most silver. This effect is why the developed film is called a negative. In order to stop the development process, water is used. It neutralizes the effects of the developer. At this point the film is developed, however the image is not permanent, there are still unexposed silver-halides in the emulsion. If these particles are exposed to light, they will turn into silver quickly. The film has to be made permanent, this is done with a chemical fixer. The fixer attaches itself to the unexposed silver-halides, preventing them from reacting to the light. The final stop is to remove all traces of the chemicals in a wash step. If fixer is left on the film, it will eventually stain the image. There are additives, like Kodak Hypo Clearing Agent, which can speed up the wash process. After washing, the film must dry.


To develop film you'll need:

* Running water
* Chemical Manufacturer Specifications
* Measuring beakers
* Place where you can mix liquids
* Very accurate thermometer, and a method of temperature control
* Funnels
* Storage Bottles
* Developer
* Fixer

Read the time chart on the side developer container to determine your film, time, temperature combo. Photo developing chemicals can be hazardous, particularly in concentrates, so always use with care.

1. Measure a certain amount of water at a specific temperature - BEST AT 68 degrees -it's usually easier to have the water hotter than the required temperature and let it cool down, or even use an ice cube to lower the temp (remove the ice cube when the water reaches the right temperature)
2. Measure a certain amount of concentrate. 1:1- 1 reel tank = 8oz.
3. When the temperature of the water is at the specified temperature, pour in the concentrate, stirring constantly.

This is the general process, always be sure of your film, temperature, developer combo is correct before proceeding. Use the thermometer during the mixing of chemicals to make sure that you are following the manufacturers recommendations - read the labels.

Starting to Develop
Gather together:

* A film processing tank and one 35mm reel for each roll you will develop. Some people prefer plastic tanks and reels.
* A scissor, to cut the film.
* Measuring graduate(s), to measure the correct amount of chemicals for your film.
* An accurate thermometer, to determine the temperature of your chemicals and the correct developing times.
* Film clips or wooden spring-type clothes pegs, to hang your film to dry.
* A can opener to open your film canister.
* An accurate timer to time your processing - this can be a watch with a second hand. Some people prefer to use their phones
* A light proof room, closet or changing bag.
* Developing chemicals - Developer, Fixer, water

Preparing to Develop Black and White Film

1. For this step you need: Loaded tank, chemicals, water, and a thermometer. This is the critical step in developing Black and White film. Using the wrong amount of chemicals, or the wrong temperature or time will adversely affect your film. Most developers have an optimum temperature. The developer we use - D76 is rated for 68 degrees.
2. REMEMBER- the four most important aspects to film development are:
3. TIME
4. TEMPERATURE (Usually 20°C or 68°F)
5. AGITATION
6. and DILUTION (Generally 1:1)
7. Mix the chemicals according to the manufacturers instructions (1:1). Pour the correctly diluted solutions your developing tank - make sure you have the right amount for your tank - it's listed on the instructions. It is best to use the same temperature every time, for consistency, rather than adjusting the time for different temperatures.


Developing Step
1. Fill the tank with water roughly the tempurture of your developer and pre-soak you film to "wake it up" for processing. Tap the tank on a hard surface - helps to dislodge any air bubbles.
2. When you are absolutely sure the developer is at the right temperature pour it in your tank at a slight angle - start the timer set according to development chart.
3. Agitate for the first 30 seconds
4. Continue agitating at regular intervals throughout the developing stage. I suggest agitating for the first 30 seconds, then each minute thereafter, at the top of the clock for about 10 seconds.
5. The most important part about agitation is to do it the same way every time. Some people say I over agitate, but it's the way I started, and I do it consistently for the first minute.
6. At the end of the time, based on the development chart to start, later you will refine your developing time, remove the outer cap (ONLY!) and pour the developer out, either down the drain with running water or back into the original beaker for later disposal.

Water bath
1. Pour the H20 into the tank, through the hole in the inner lid, then put the outer lid on.
2. Agitate continuously for 30 seconds. But don't forget to invert and bang.
3. Remove the outer lid, and pour out the chemicals.

Fixer
1. Pour the fixer into the tank from the container clearly marked FIX, through the hole in the inner lid, then put the outer lid back on. Be sure to make a hash mark on the continer for every roll of film you develop.
2. Agitate. I agitate for about 20 seconds, then every minute for about 10 seconds.

1. At the end of the manufacturers recommended time - 5 mins for normal film, 10 mins for T grain film. Remove the lid (it's now safe to remove the whole lid if you want), and pour the chemistry back in the container. DO NOT POUR FIX DOWN THE DRAIN!!

Fix down the drain = Dead fish

Rinse and Hypo
1. Remove the inner lid.
2. Run water into the tank. I like to run water for about 15 seconds.
3. Fill tank with Hypoclear and agitate consistantly for 2 minutes.
4. Pour Hypoclear back into the correct container, be careful not to mistake FIX and HYPO bottles.

Washing
1. Place film in Turbo washer - turn on water to create bubbling, think champaine not fish
filter.
2. Wash film for 5 minutes. CLEAN-UP WHILE YOUR FILM IS WASHING!
3. *Be sure to never add film to wash once initial cycle has started.

Photo-flo (LFN)
1. Empty the tank, and take the film over to the wetting agent area (Kodak Photo Flo).
2. Put the reel(s) in the wetting agent according to the recommendations (30 seconds).
3. Remove the reel from the tank.
4. Slowly pull the film off of the reel.
5. Using your fingers as a squeegee, ever so gently, squage your film to remove any water droplets.
6. RESIST THE TEMPTATION TO LOOK AT FILM WHILE WET, unless you like dust.
7. Weight the bottom of the film, with clothes pin, or film clip. Be careful to not scratch the negatives, they are very soft at this point.
8. Hang in the drying cabinet - open the door very slowly as not to create a vacuum.
9. RELAX... film takes about 20-30 minutes to dry. Weather permitting.

Storing
1. Remove the weight from the bottom of the film.
2. Count up 5 frames, cut between the 5th and 6th frame. 5 frames fits across an 8" sheet of paper, and fits into negative sleeves.
3. Put each strip into a separate negative sleeve.
4. Label the sleeve with a sharpie
5. Keep cutting into 5 frame lengths until you've cut the entire length of film.
6. NEVER LEAVE ONE FRAME AT THE END, better to have at least 2 frames next to each other.

Tuesday, January 26, 2010

SHUTTER SPEEDS AND APERTURES

Aperture


F-stops
f1 f1.4 f2 f2.8 f4 f5.6 f8 f11 f16 f22 f32 f64


All cameras, whether an ancient film camera, or a more modern digital, work in pretty much the same way. Photographs are taken by letting light fall onto a light-sensitive medium, which records the image.
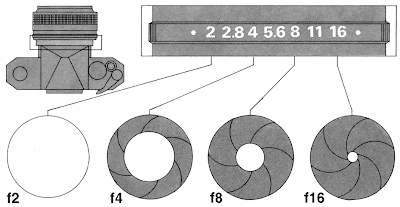
The aperture controls the amount of light that reaches a light sensitive medium, wither it be digitally, film, or paper. The aperture controls the intensity at which light will strike the film. An aperture acts much like the pupil of an eye that opens larger as light decreases to let in more available light. The pupil shrinks when light increases to reduce the amount of light entering the eye.
Put simply, a camera consists of a light-tight box or even film canister, that stores a light-sensitive device, a lens that magnifies and focuses the image onto that light-sensitive device through a hole in the box (called the aperture), and a shutter that opens and closes when you press the shutter release, exposing the film to the light; this is why a picture is sometimes called an exposure.
The amount of light entering the camera depends on the amount of light in the scenes that you’re photographing. A bright sunny cloudless day has more available light than a cloudy one, which in turn has more light than an indoor scene lit by tungsten lighting. To make the picture look right, we have to expose the film to the right amount of light. Too short, and the image will be light, or underexposed. Too long, and the image will be dark, or overexposed.
The combination of aperture and shutter speed are related, and effect the exposure value. The faster the shutter speed, the larger the opening of the lens and visa versa. Aperture and shutter speed have to come together in balance based on a given lighting scenario to make the proper exposure.

The diameter of an aperture is measured in f-stops. A lower f-stop number opens the aperture and admits more light onto the camera. Higher f-stop numbers make the camera's aperture smaller so less light hits the film.
When an aperture is opened up by one f- stop, the amount of light which reaches the film is doubled.
Aperture settings can be used creatively to control depth of field, how much of a photo is sharp in front and back of where you focus on the main subject. The technique is useful for close-up and portrait shots.


Shutter speeds

B 1 2 4 8 15 30 60 125 250 500 1000 2000 4000
The concept of shutter speed isn’t too hard to understand. The longer you leave the shutter open, the more light that strikes the film, resulting in a darker image.
Shutter speeds are measured in fractions of a second, and is the time taken from when the shutter opens to when the shutter closes, after you’ve press the shutter. Moving from one speed to the next either halves the amount of light that can enter the camera or doubles it. The change from one speed to another (and halving or doubling the light that enters the camera) is called moving a stop. What affect does changing shutter speed have on your final image? As well as controlling the amount of light that enters the camera, shutter speed effects motion and blur. While fast shutter speeds can “freeze” motion, slower shutter speeds extend activity or blur moving objects.

Film and Exposure

Film and Exposure

Films:
Black and White – You will be using T-MAX 400
• Negative
Panchromatic – film that is sensitive to all the wavelengths in the visible spectrum.
Orthochromatic – film that is sensitive to blue and green light but not red light.
Film’s make-up:
[ Scratch resistant top coat
[ Light sensitive emulsion
[ Film base
[ Anti-halation coating


Cross section of film emulsion.

The Latent Image is formed when light acts on a photographic emulsion. This image is invisible until the emulsion is developed using photographic developers, such as D76

ISO/ASA
To calculate the ASA number multiply the ISO by one.
The ASA number is a measurement of the film's sensitivity to light, often referred to as its “speed”.
1. The higher the number the more sensitive to light.
2. As the number doubles, the films sensitivity to light doubles
3. Lower ISO films have less grain structure.
4. Higher ISO films have more grain structure.

Other film characteristics:
• Grain
• Contrast
• Expiration Date
• Storage Temperature

Exposure
Exposure is the amount of light that strikes the photo material -- film or printing paper.
Four things effect the exposure:
1. The film ISO
2. The amount of available or existing light
3. The time the light strikes the film
4. The intensity of light that strikes the film in that time.

Exposure = Time x Intensity
Shutter Speed
Time is controlled by the shutter. The time the shutter remains open lets light strike the film is controlled by the shutter speed. Typical shutter speeds:
1/1000 1/500 1/250 1/125 1/60 1/30 1/15 1/8 1/4 1/2 1 B
fast shutter speed = less light slower shutter speed = more light
1. As the shutter speed is increased (a faster shutter speed) less light strikes the film.
reducing the exposure
• Increase the shutter speed by a standard “unit” reduces the light striking the film by half.
2. As the shutter speed is reduced (slower shutter speed) more light strikes the film,
increasing exposure.
• Reducing the shutter speed by a standard “unit” doubles the light striking the film.

Shutter speed controls the illusion of motion
1. fast shutter speeds stop action
2. slow shutter speeds blur motion
3. panning freezes subject and blurs background

F-stops and Apertures
The intensity of light that passes through the lens and strikes the film is controlled by the
Aperture. The aperture is expressed in f-stops. Typical f-stops are:
f 1.4 f2 f2.8 f4 f5.6 f8 f11 f16 f22 f32 f64
< ---- more light less light ---->
• A large aperture, such as f2, lets in more light than a smaller aperture such as f16
• Each time the aperture decreases to the next smaller f-stop the amount of light it passes is cut in half.
• As the aperture increases to the next bigger f-stop the amount of light it passes
doubles.
• Different f-numbers provide different depth-of-fields.

How to determine the correct exposure
1. Film instructions
2. The sunny f16 Rule = In full sun set the camera aperture at f16 and the shutter to the speed of the ASA/ISO you are shooting.
3. Light meter
• Only a guide - it is only as accurate as the person using of it
• Light meters interpret (some) colors and tones as medium gray (18%)
• Never point your light meter toward the sun!!!

Camera Light meters
• Battery
• One shutter speed may work without battery
• Always have extra!
• Preset (No light meter)
• Manual
• Semi-automatic
• aperture preferred
• shutter preferred
• Fully automatic
• Programmable
• Displaying exposures - needle match Vs centering Vs lights

Bracketing
Taking several different exposures of the same scene at different exposure settings, some greater than and some less than the setting indicted by the meter, to ensure a well exposed photograph.


SUNNY 16 RULE

Getting started.....

The first thing we'll need to address is the syllabus and class schedule:

ART 160 Section 1132 Fall 2010

Class Title: Basic photography Time: M-W 11a – 1:50p

INSTRUCTOR: Rob Keller

rkeller@dvc.edu or bordog@me.com

OFFICE HOURS: M-W 10:30 – 11a or by appointment

COURSE DESCRIPTION

This is an introductory photography class structured to provide a solid foundation in black and white analog image making. The class will cover the working knowledge of the basics of traditional black and white darkroom photography. Instruction will include 35mm camera operation, film exposure and development, printing, basic lighting concepts, composition, and photo finishing. This course will emphasize the technical aspects of analog photography including the history, theory and practice. Through specific assignments students will not only gain technical skills, but also develop their own artistic vocabulary by learning to use the photographic medium as a means of creative expression. Class critiques will be used to analyze and discuss photographic images.

STUDENT LEARNING OUTCOMES

Results for ART-160 course outcomes. Students will be able to...

At the end of the semester each student should have acquired the necessary skills to produce effective and visually compelling photographic images for class presentation.

SLO#1. students completing the course should demonstrate an understanding of basic black and white photographic printing techniques.

SLO#2. students completing the course should demonstrate knowledge of proper black and white photographic film exposure and film processing techniques.

SLO#3. students completing the course should demonstrate an understanding of the basic principles and concepts of composition and design to communicate visually using black and white photographs.

PROJECTS

Projects will be graded on both technical proficiency and creative visual content. Students will be expected to discuss and defend their work. Assignments will demonstrate mastery of technical skills and individual creative expression. Through photographic presentations and discussion, students will gain familiarity with the critical and theoretical debates surrounding photography and analytical dialog.

HANDOUTS AND LECTURES

Each week there will be a lecture and students will receive handouts with the information needed for the next week's assignment. The schedule may change at any time during the semester. If you miss a class or assignment you are responsible for contacting the instructor.

ATTENDANCE POLICY

Attendance means arriving on time and staying for the entire class session. You must be present at all critiques whether or not you have completed the assignment. All students are required to have active communication and dialog. Failure to be an involved participant in the class, tardy arrivals and early departures will affect your final grade. If you have more then 3 unexcused absences you could be dropped from the class. Due dates are important, late assignments could result in a lower grade.

GRADING

All aspects of the class are equally important:

Quizzes – 10%

Monthly Projects –20%

Final Project – 50%

However, your contribution to the CLASS DIALOG AND THE WRITTEN FINAL will weigh very heavily on your final grade.

REQUIRED MATERIALS

35mm CAMERA:

Recommended manually adjustable apertures and shutter speeds.

PHOTOGRAPHIC PAPER:

Recommended: ILLFORD Multigrade II RC

You will need approximately 50-150 sheets for this class.

FILM:

Recommended: Kodak 400 TMAX

You will need 15-30 rolls for this class

Negative preservers (5 frames x 7 rows)

3 ring plastic negative protector, Portable canned air - dust off, Plastic apron, Cotton towel, sharp scissor

RECOMMENDED MATERIALS

Protective clothing and rubber gloves, “Sharpie-type marking pen, and

Optional * Sketchbook for collecting ideas and logging data.

HEALTH AND SAFETY

THIS FACILITY IS FOR USE BY CURRENTLY REGISTERED PHOTOGRAPHY STUDENTS ONLY.

UNIVERSAL DARKROOM LAW -

Keep wet away from dry! There are specific wet and dry areas for all printing areas. Sinks are wet, stations are dry! No wet hands, no wet prints, no trays are to be near the enlargers.

There is an “ABSOLUTELY NO CELL PHONE” policy in place at this facility. All cell calls must be taken outside to avoid disturbing the class.

*** IF YOU HAVE ANY QUESTIONS OR NEED HELP, PLEASE LET ME KNOW IMMEDIATELY. DO NOT PROCRASTINATE